Here are some of the most common errors our Print Quality Specialists catch when reviewing orders for photo books.
The gutter, most simply put, refers to the area where opposing pages of your photo book meet. You can also think of it as the binding area. The following screenshot is an example of where the gutter area is located:

*Note The thicker your book (more pages), the deeper the Gutter Area will be.
Any elements placed in this gutter area have the possibility of being lost in the binding or misaligned. While Mixbook gives you the ability to spread elements over two pages in your memory book yearbooks, there are three common mistakes you should try to avoid. See our online yearbook example below for context:
1) Keep faces out of the gutter!
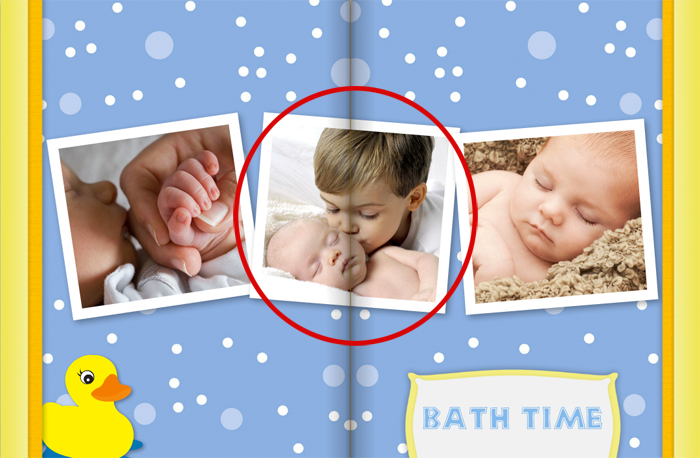
Unlike photo cards, where spanning photos across two pages is allowed, in photo albums when a face is placed near the binding of a book, problems arise. Because the parts of the face will print on separate sheets, there is a chance that they won’t completely line up when the book is bound. Depending on how the photo is placed over the gutter, there is a possibility that the image will be duplicated or corrupt.
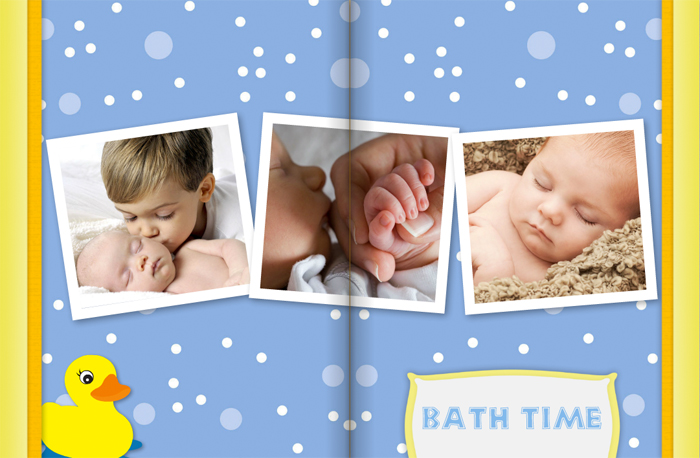
The above page has placed both the baby and the toddler’s face right on the gutter area. To fix this, we have swapped the photos to ensure that the boy’s faces print correctly.

2) Keep text away from this area!
This tip applies to both text in text boxes and our stickers! Text placed in this area can be lost in the binding. This can cause your book to say something completely different or worse—make no sense at all! If you do want your text to span across the binding, we would suggest adding a text box to each page. Type in the text and use our Smart Guides to make sure they line up and look great spanning your two-page spread. You will also want to make sure to keep the text well away from the gutter.

This sticker contains the text “New Adventures,” which has been placed right through the gutter area. To fix this, we have moved the sticker onto the top corner of a single page, making sure that it is far enough from the edges to not be cut off or lost in the binding. (P.S. This layout can be found in our Travel Magazine theme.)

3) Keep image stickers away from the gutter area (when you can)!
If only a portion of the sticker is spilling onto the next page, you’re probably safe. However, if the center of your sticker falls on the gutter, you may run into problems! Again, you risk the chance of losing the middle of the sticker in the binding or having both halves line up incorrectly. **Please note, design type stickers, such as flourishes or overlays will look fine over the gutter. However, actual object images, such as watches or animals are the stickers you’ll want to watch out for.
This watch sticker in the layout above is placed well into the gutter area. To fix it, we have moved it to the right to get most of the sticker away from the binding. Having the sticker spill slightly onto the next page will not affect the alignment.

If you keep a lookout for these three common layout mistakes, you can be sure you’ll have a beautiful book! Got a question you want to ask our Education Specialist specialists? Let us know in the comments below and we’ll make sure to address it in a future post.
Related Yearbook Products:
wedding album, professional photo books, professional photo book printing, graduation announcements, bulk photo books, photo book coupons, wedding invitation templates, save the date postcards
Related Yearbook Posts
Comments
{ 1 comment }

 This is the most common warning you will encounter. This warning means that your photo has low resolution and will likely print out pixelated or blurry. To rid your project of this warning you will need to shrink the photo until the triangle disappears. Alternatively, it’s possible that the file you have uploaded is a compressed version. If you have access to the original file, we would suggest uploading that file instead.
 This triangle will show up in your Photo tray. If you see this warning triangle, it means that you will need to re-upload your photo. An error occurred when the original upload took place, preventing the file from completing its upload onto our servers. To fix this, upload the photo into your project once more and you’ll be ready to place those images into your project in no time!
 This triangle can be found on the pages of your project – either in the editor or in your preview. If you see this warning triangle, it means that our editor is having trouble pulling your photo from the third party platform, such as Facebook or Picasa. One of two things could have happened:
